Friday, July 20, 2012
Past Project: Transforming Bed
It's actually called a murphy bed. You knows the ones...the ones that fold up into the wall. Nicely tucked away, so you can actually USE the room. I'm one step closer to my lifelong goal: To create a transforming HOUSE!! woohoo!
Almost finished.. final touches left. Was thinking of adding shelves on top of the unit. But Lina found these awesome TRANSFORMING crates that color match the walls and bed!
Gotta fill in the holes with something decorative. Since that's minor.. that'll have to be postponed as another project.
I think I'll try to color match the little cubby unit too. (yet another project.. sigh)
Added an addition to the unit! I already had the spare wood and paint.. might as well.
Thursday, July 19, 2012
Past Projects: Shift Boot reupholstered
Man, I have no idea how long this post was... I'm guessing 7 years ago?
Todays project is of one Lina and I did a couple years back. It was to dress up the interior of her Miata. The leathers were pretty worn out in the little 15 year old car. A short project that involved a little bit of vinyl and a sewing machine. We learned that our consumer level sewing machine can't really handle stitching more than 2 layers worth of the vinyl. That's when my uncle came to our rescue. He gave us access to his shop with industrial strength machines! cool. Those machines were able to sew more than 6 layers worth!! Super cool.
These boot still lasts till today!! A little pat on the back.
Past Projects: car Grill "R" Logo
I never really did install this logo onto my Skyline. Was afraid someone would just go steal it. I have it in a hobby box somewhere.
I needed a little something something to fill a big gaping hole that is my grill on the Skyline. Couldn't really use "GTR" cause the car really isn't one. (I'm not a poser) So, I just made a simple "R" that's short for R32 which is what I have. Ironically, after this project is complete, it'll be more of a GTR than anything else... even more than a stock GTR!
This was a simple and short project. (I'm posting this one up for Mabel!!)
1) Sketched out and carved the "R" onto a small piece of wood. (I used plywood here. Doesn't really matter what kind. Less porous the better. I could've easily used Sculpey to do the job) In your case, Mabel, just use the Pinky part! Whatever you want to cast.
2) Put the "R" into a small box. If the object you want to make a mold for is irregular, you may need to do 'halves'. Use plasticine for that. Just follow the factory seam line. If it's good for them, it's good for you. Don't forget the keys!!
3) Coat "R" with a releasing agent. I used a special wax specifically for resins.
4) What I used to make the molds is a 2 part Pour-a-Mold rubber compound. (Industrial Plastics and Paint). Good stuff! And they have different 'rubbery-strengths' for different apps. Softer for more deep undercuts, harder for more detail. You simply mix 50% of A into 50% of B in a small cup. Stir thoroughly! But, don't mix it so fast that the stir stick creates tiny bubbles!
5) Pour mixed solution into box. Wait.
6) When dry(I waited for 24hrs), carefully peel the mold off.
7) Coat some wax into the walls of the mold.
8) the fiberglass resin mix. The ratios are different between products! Some are like 50parts resin to 1 DROP of mekp(hardener)! Just read the instructions. And don't do it indoors!! yucky.
9) When dry, again carefully peel the cast out! Now, you should have an exact copy of the "R"!
10) Sand and paint
Project: Mini-Z drift tires
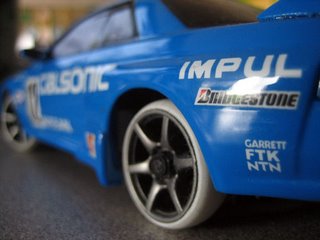
Man, these little racers are so awesome. I really should dust them off and play with them again. Reading these old posts sure does bring back the nostalgia.
We've been playing with these little R/C cars for a few weeks now. Even setup a nice track here at work! About 6 of us race regularly. But, I've started to favor a different kind of racing. Drifting! It's alot of fun on such a small scale. ALOT cheaper too when things go bad. Replacing parts are alot easier than their real counterparts. Heck, sometimes we'd just scratch build a new custom part. Couldn't do that with a real car.(well... you could. It just wouldn't be safe!)
Drifting is technically not a 'race'. Focusing and judging not on speed rather the performance. It's how you drive "sideways" into a corner. When performed right, it's simply the coolest thing on four wheels.
Now, I'm doing it on a 1/28 scale.
You can find the step-by-step HERE.
Past Projects: Chicken Lord
Another one from 10 years ago! Was eventually given as a gift to an old supervisor and friend.
This little guy was spawned out of frustration really. I was surrounded, at work, by a bunch of guys that were into a game called Warhammer. Pretty nerdy game. The game pieces are small miniature scupltures of little army creatures. The guys would talk Warhammer ALL DAY LONG. Then I'd poke fun and say I was gonna raise an army of chickens and beat them all! That would've put them in their place! So, I went home that night and started sculpting. With a (really) small chunk of Sculpey and some wire, whipped up the little chicken.
Well, I never did get to make that army. But, then again.. I was moved out of the room. Just as well.
This little sculpture was then given to a friend as a gift. Thought it was quite appropriate. It was the year of the chicken and he was going to 'cross' the (big watery) 'street' to get to the other side (for work).
Who's the nerd now!?!
Past Projects: Valentine's Diffusor
Wow.. can't believe this one was 10 years ago!
It was the day before Valentine, I was pretty desperate. One quick trip to the hardware store and the local craft store for bits. While Lina was away, I quickly assembled and painted the entire unit. The outcome was well recieved.
Past Projects: Wooden Lock
Got a great little book.. forgot the name of it. I'll have to find it someday and post it up here..
Thought this was a funny idea. A lock made of wood. (6 different kinds of hardwoods to be exact. Mahogany, Oak, Teak, PurpleHeart, Hickory, and Pine) It was made as a Christmas gift for the family. It's got the family seal on the front. And yes, it does work. The key does turn inside, making the internal mechanisms open the locking shaft. AND IT'S ALL WOOD. I was so tempted to 'cheat' at one point and use metal or plastic for the spring... but was determined to find the proper wood for the spring. Hickory was the one!!! Soft enough to flex but not brittle enough to break. It was so much fun making this, I made 5 more. The last one, that is STILL unfinished, is the most ambitious... the combination lock! I maybe able to finish it for this Christmas... maybe.
Projects Archives
Making this blog for all my random projects. One stop shop now. Let's start with some of the oldies, but goodies. I'll (present-time) comment in non-italics, while the original (past-time) posts will be in italics.
Subscribe to:
Posts (Atom)